Migrating this blog from Gandi to my NAS
By Vince on 2020-02-08, 15:57 - Logiciel - Permalink

In January 2020, I received a mail from Gandi, the registrar for my domain name, stating that they were ending the free "GandiBlog" feature after 13 years of service.
I admit I'm not using this blog much, but some posts have been somewhat popular, so I thought I had to migrate it and started considering my options:
Gandi themselves propose a migration path but it requires a paying hosting, and I didn't feel like paying for such a small use. So I started investigating the possibility of hosting the blog locally on my NAS, and here is the result...
The migration options
The standard way to host a blog on Synology NAS is Wordpress, which is provided as a package, while GandiBlog was powered by Dotclear.
Although Dotclear has an import/export plugin, I discovered that even if much progress has been made on cross-compatible file formats for Office applications, nothing of the sort seems to exist for blogs. Dotclear's export looks like a text database backup and a zip with all medias. Of course the format of the database being different between blogging platforms, there is no standard way to migrate from one format to another, not even talking about keeping working menus, categories, and such.
Some websites such as cms2cms propose the migration as a (paying) service, but I doubted the migration would be seamless and would keep compatible URLs. Plus, it seemed silly to me to have to learn a new blogging system while I was perfectly used to Dotclear and happy with it.
So hosting Dotclear on the NAS sounded the most promising option for a hassle-free content migration.

Here we go for the details and traps I fell into. I hope it will help others.
Installing and configuring Dotclear on the NAS
Side-note: I immediately rejected the idea of manually installing any software on the NAS. Logging in to a Linux shell, installing scripts, services, modifying crontabs, even recompiling software to make them run on a Synology. Been there, done that. You can end up with an incredibly efficient tailored setup, but then comes the nightmare of Synology DSM updates, messing up with your customizations. After a few times, you start skipping updates, which is not advisable from a security point of view of course. So I now want to keep running only with standard, supported, Synology features.
Knowing that, and not finding a Synology package for Dotclear, I first tried the Docker route. Docker is supported on the NAS and allows you to deploy any third party "container", which are a sort of "mini-virtual machine". There is a Docker image of Dotclear ready for deployment and after a bit of fiddling, it worked perfectly.

Note: All Dotclear requires for installation is a blank MySQL database, and luckily MySQL (or more precisely the MariaDB fork of MySQL) is provided by Synology as a standard package.
The only issue I ran into is that there are two packages to choose from: MariaDB 5 and MariaDB 10. I had both installed and selected the MariaDB 10 thinking it would be more futureproof. However, as the two instances cannot share a single port, Synology put MariaDB 5 on MySQL's standard 3306 port and MariaDB 10 on port 3307... and Dotclear has no option to specify the port, so it will look for the DB in MariaDB 5. I just had to re-create a blank DB on MariaDB 5 to make Dotclear's installation wizard happy.

OK. All was starting to take shape but the Dotclear server running in Docker was reachable using a specific port and I then realized that Dotclear consists only of a bunch of PHP files and, in the end, doesn't require anything special to run, except for a web server with PHP. And Synolgy's standard Web Station package is just that...
Consequently, I moved all Dotclear files to a "myblog" folder under the "web" root of Web Station, and simply could reach the blog with http://<myhost>/myblog/ , so I abandoned the Docker route, which would have made things uselessly complex and would have wasted CPU and memory resources.
Restoring the contents.
Using Dotclear's import plugin, I restored the backup and concentrated on the blog contents. Although the version I just installed was more recent than Gandi’s, the process went smoothly and the text contents was immediately available and mostly OK (just had a few words with underscore such as Arduino_DpPin which now were interpreted as a "subscript" styling option, but I escaped them with a backslash and the issue went away).
Images however had disappeared because the links referred to the absolute "/public" folder while they were now under "/myblog/public"...
Note: Don't do the following operation ! It proved to be an error. Read till the end to understand why 
I performed a massive search/replace in the backup file to make all links relative (removed the slash at the beginning of "/public"), dropped the DB, created a new one and restored the edited file, and images started to appear. In fact, not all images worked: The thumbnails didn't seem to have made it to the media backup, so I just downloaded the files from the old - still online - version of the blog and dropped them in the public folder.
Fixing the URL.
Things started to look good, but I also wanted the URLs to remain identical.
As you can see if you click on this post's title, the URLs of the blog are like:
http://blog.deconinck.info/post/2020/02/08/Migrating-this-blog-from-Gandi-to-my-NAS
while the ones I had were more like:
http://192.168.1.100/myblog/index.php?/post/2020/02/08/Migrating-this-blog-from-Gandi-to-my-NAS
So several things had to change, from left to right :
- Make it available from outside my network through my public IP address.
This is achieved by configuring your internet router to add port forwarding of port 80 (from port 80 on its external_address to port 80 of your NAS). It goes without saying that the internal address of your NAS should be fixed, either by setting it in the NAS or by making your DHCP server always return the same IP based on the NAS’ MAC address.
- Configure a dynamic DNS service so that when your external IP changes (after a modem/router reboot for example), the name resolves to the new address.
This is achieved by subscribing to a dynamic DNS service. There are many paying options and also a few free ones such as DuckDNS, but as a Synology owner, you are granted a free and high quality dynamic DNS name like <whatever>.synology.me (or subdomains of other Synology-related domains) so that’s my favorite option.
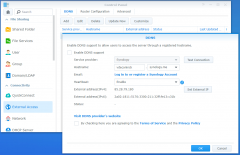
The configuration is straightforward from your DSM's control panel, in the External Access section. Your NAS will then make sure the redirection is adjusted whenever your external IP changes.

- Configure the domain name so that its DNS fowards the chosen subdomain to the dynamic DNS name.
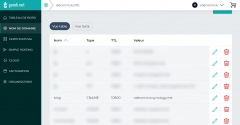
This is achieved by configuring a DNS entry from Gandi’s control panel. In my case, it meant editing the "blog" DNS record to read "blog 10800 IN CNAME vdeconinck.synology.me."
(note : this line previously read "blog 10800 IN CNAME blogs.vip.gandi.net." . As soon as you change it, your old blog will stop functioning, so I suggest you perform this change last, when everything else is ready, or first use a temporary entry such as "newblog" instead of "blog")

- Get rid of the "myblog" subfolder.
This can be achieved several ways. The most straightforward option is to just move all the contents one level up to the "web" folder, but that means your server will basically only host your blog (you could technically mix other contents with Dotclear files but I strongly advise against that).
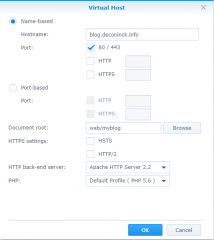
I preferred to go another route and dedicate a "Virtual Host" to the blog. This can be done in the "Virtual Host" section of the Web Station package by redirecting "blog.deconinck.info" to "web/myblog" For the next step to work, please choose Apache as backend server (url rewriting is probably doable with NGinx but I have no experience with it).

- Get rid of the "/index.php?".
This part got me stuck for a long time because I thought I needed the "PATH_INFO" mode, but never could make it work, and here is the right way to do it.
We will achieve this goal by performing two symmetrical operations: rewriting incoming URLs and use shorthand versions of the URL in generated pages.
The idea of this URL rewriting is that the blog actually runs with "index.php", so this page needs to be called even if it is missing from the incoming URLs. To do so, you just have to create a ".htaccess" file in the "web/myblog" folder, with the following contents:
RewriteEngine On
RewriteCond %{REQUEST_FILENAME} !-f
RewriteCond %{REQUEST_FILENAME} !-d
RewriteRule ^(.*)$ index.php?$1
This basically means that the rewriting engine must be turned on, and if the incoming URL is not an existing file or directory, then take everything that follows the hostname, and put it after a "index.php?" prefix.
Conversely, as indicated above, you need to change the blog configuration in Dotclear's management UI, removing the "/index.php?" part (and ignoring the warning about the question mark because this is a "special configuration"  )
)

Note that once the shorthand URLs respond, the browser gets confused by relative links because it interprets URLs such as http://blog.deconinck.info/post/2020/02/08/Migrating-this-blog-from-Gandi-to-my-NAS as being a file in the /post/2020/02/08 folder, and bases relative links on that folder. Consequently, all image links I had changed above were now pointing to files in the non-existing folder /post/2015/10/18/public ...
The solution was thus to make them absolute again, and the public folder being now at document root of the virtual host, the required prefix was ... "/public", so I had to undo my first change  .
.
Conclusion
All in all, I'm pretty satisfied with the result as I now have full control of the installation, I can back-it up along with all my data, and it should be running for free for the next 20 years at least 